
Sailboat Charging Systems
This page is dedicated to off-grid sailboat electrical charging systems. This page is under construction.
First some notes about safety: American Mainsail, LLC and its authors are not licensed marine electricians. Marine electrical projects can carry risk of electric shock or fire. Consult and always follow manufacturer’s manuals and instructions. Consult a qualified marine electrician before undertaking a marine electrical project. The Many qualified marine electricians are available that can offer their expertise while you design and build your system, some are even available to offer advice over Facetime/Skype/the phone. The purpose of this article is to get you pointed in the right direction and asking the right questions when thinking about your marine electrical system. It reflects advice based on the author’s experience. This article is not a comprehensive set of instructions on how to wire your specific system and does not represent the advice of a qualified, marine electrician.
General Resources
Victron Energy complete sailing yacht power system (both LiFePO4 and Lead Acid battery based systems shown): https://www.victronenergy.com/markets/marine/sailing-yacht#complete-system
InvertersRUs B-Stock List: https://invertersrus.com/victron-energy-b-stock-sale/
Great deals to be had on used, quality Victron equipment.
Alternators
Alternators are a fantastic way to recharge house batteries. Many alternator systems are available today that can put out comparable amounts of power to a small, diesel generator. Even small, low capacity alternators can serve as a decent way to supplement power generation while motoring.
Resources
Battle Born Batteries - Charging Lithium Ion Batteries, the Basics: https://battlebornbatteries.com/charging-lithium-batteries-the-basics/
When charging LiFePO4 (LFP) batteries with an alternator, it’s important to understand potential downfalls.Because LFP batteries can accept so much current, alternators can burn themselves out by supplying too much current to the batteries. See this resource from Battle Born Batteries above for a general primer on charging LiFePO4 batteries.
Wiring Size Calculator
Sizing the right size wire for your alternator is very important for both safety and good performance. Be sure to specify copper wire. Try to keep voltage drops around 2%. Find the max. temperature specs. for the wire you intend to use to plug into the calculator. I suggest only using quality, marine-grade battery cable wiring. I suggest plugging in temperature specs. into the calculator that are well below the maximum specified temperature of the wire you’re using. Generally, plugging a 1-3% voltage drop in the wires should ensure that your wire won’t get hot, but it’s always smart to be as careful as possible when sizing wires.
PKYS Alternator Mounting Guide
Cover dimensions and mounting of alternators.
High-Performance Alternators
High-performance, externally regulated, alternators are getting to the point where they are replacing separate, diesel generators on many sailboat power systems. These kinds of alternator systems can be programed to control charge/heat with their external regulator. Note that an externally-regulated alternator is essentially required in order to charge LiFePO4 batteries directly. Internally-regulated alternators can sometimes self-destruct when directly charging LiFePO4 batteries due to these kinds of batteries lower internal resistance; they can force the alternate to produce more current than the alternator is capable of handling sustainably.
Since alternators are air-cooled and sit in a hot, enclosed engine bay, heat management can be somewhat problematic with very high performance alternators (think 250+ amps). Poke around on YouTube and sailing forums for ideas of what sailors are putting together to handle cooling these kinds of setups.
Balmar is the original player(ish) in the high performance, sailboat marine alternator game. They were installed as a factory option on many sailboats.
Balmar 621-Series, 100 Amp, Single Foot, Alternator Kit (West Marine) (Amazon)
This alternator is a full, high-output alternator kit that includes the high-output alternator, regulator, and control wires.
Wind Generators
I believe that wind generators have strongly fallen out of favor with most sailors that are building modern electrical systems on their boats. Solar panels, combined with LFP batteries, provide a fantastic amount of power for their size and weight footprint. Wind generators require a mast that is clear of any obstructions, are heavy, and are generally very expensive for the amount of power they are capable of providing, which is generally minimal. While some models, such as the Primus Air Silent X Turbine (Amazon affiliate link) are engineered to be whisper-quiet, many small wind turbines are very loud.
When industrial wind turbines are sited, a considerable amount of effort is spent identify locations where the prevailing wind is strong and steady. On a sailboat that is spending considerable time moving, on anchor, mooring, or docked typical wind speeds (5-15 knots) usually usually aren’t enough to produce reliable power. Sailors generally report that their small turbines produce around 1-5 amps of 12V power; hardly enough to contribute much at all to their overall energy usage. A decent sized (400 watts or greater) solar panel array can be expected to contribute more than this even on a cloudy day.
If your boat spends a significant amount of time in an area that blows a steady 15-20 knots (such as a winter liveaboard slip in a windy area - again - siting is key), wind generators might be worth the cost, weight, and drag they add to your boat.
If you are planning on charging a LiFePO4 battery system with your wind turbine, or upgrading your battery system to LFP and you already charge with a wind turbine, be sure to verify with the manufacturer that the wind turbine’s charge controller is capable of charge LFP batteries. Wind turbine charge controllers can have similar problems charging LFP batteries as alternators do.
Resources
Primus Wind Power Product Selection Guide: https://www.primuswindpower.com/wind-power-products/product-selection-guide/
Notice on Primus’s power curves that these units don’t start producing >100 watts of power until the wind strength is around 15 knots. Put consideration into the average site conditions your wind turbine will be experiencing before sinking resources and effort into a wind turbine. Most sailors won’t see appreciable power out of these units.
Wind Turbine Calculator: https://www.omnicalculator.com/ecology/wind-turbine
Great, free calculator for verifying manufacturer’s power output claims. Most small wind turbines can be expected to operate in the area of 20-30% efficiency. I have verified Primus’s power curves with this efficiency percentage and they are spot on.
Solar Power
Solar is the backbone of most off-grid marine/sailing power systems. It is usually the most efficient way, from a cost and practicality perspective, of generating your own power.
Brainstorming your setup? Check out this link for a gallery of boat solar installations: https://www.custommarineproducts.com/gallery-of-installations.html
Bifacial Solar Panels
The ideal sailboat solar configuration has the smallest area (for reduced drag, weight, and space considerations) for the amount of energy production needed. Ideal panel installations also perform as well as possible on cloudy days (because we all hate running our generator).
Due to their increased energy production per sq. ft of panel and promising cloudy-day performance, bifacial solar panels are showing some excellent promise for sailboats; and any boat, for that matter. Bifacial solar panels capture light on both sides of the panel. Both the top and the bottom of the array are exposed and available to capture energy from the sun. Land-based tests have shown increased energy production, on the order of 25%, depending on configuration, and especially on cloudy days. I believe that bifacial panels will be especially productive on panel installations that are cantilevered over the water, as they will capture light that is diffusing off the water on their back side. I will be testing bifacial solar panels arranged in this way soon.
Resources
Custom Marine Products Solar Resources: https://www.custommarineproducts.com/handy-info.html
Land-based bifacial solar panel test (very good): https://www.youtube.com/watch?v=1SXNjsSsmq0&t=628s
Tests bifacial panels vs. standard solar panels side by side
Another land-based bifacial solar panel test (also very good): https://www.youtube.com/watch?v=Lbhx2fBiU5o
Tests bifacial panels vs. standard solar panels side by side
Cruiser’s Forum Reactions to bifacial panels: https://www.cruisersforum.com/forums/f14/bifacial-solar-panels-250764.html
Buy Bifacial Solar Panels
Consider sourcing solar panels from a local supplier. Rigid panels are bulky and heavy, so shipping can often exceed the price of the panel. If you don’t have any local options available, check out these online sources:
AltE Store, local to us in Massachusetts, has a very good online store that carries many quality solar panels, including some bifacial panels:
Renogy is perhaps the top off-grid marine/RV solar panel supplier. Here is a list of their popular bifacial panels:
Renogy 115W bifacial solar panel: https://amzn.to/3GYwZzG (affiliate link)
Size: 30.9x30.0x1.2in
Weight: 13.5 lbs.
Renogy 220W bifacial solar panel: https://amzn.to/3S17BiU (affiliate link)
Size: 60.9x30.0x1.2in
Weight: 28.0 lbs
Renogy 550W bifacial solar panel: https://amzn.to/48elQH3 (affiliate link)
Size: 89.72x44.65x1.38in
Weight: 58.4 lbs.
Flexible Solar Panels
Flexible solar panels are the lightest and (perhaps) the most versatile solar panel for sailboats. Racer/cruisers should seriously consider mounting these solar panels either on their dodge, bimini (if that’s how your race boat is configured), or even deck. They tend to be more expensive than normal, solid-frame solar panels, and are less efficient..
Series/Parallel Solar Panel Connections
When wiring solar panels together into a solar array, it’s important to understand the different ways solar panels can be wired together in order to pick a controller. Solar panels can be wired in series, parallel, and series/parallel. These different ways of connecting solar panels together impact the voltage and current the solar panel array makes, and therefore the voltages and currents the solar charge controller will see. See the diagram below, taken from the manual of a Victron 150|50 solar controller for an explanation of series/parallel wiring.
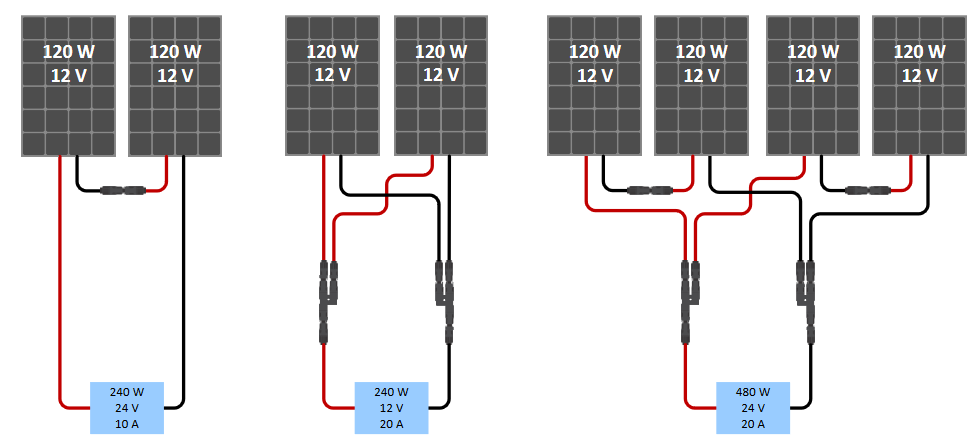
Series, parallel, and series/parallel wiring. Each of these solar panels shown is a 12 volt, 120 watt solar panel capable of making 10 amps of current. To the left, the two panels are wired in series. The overall area produces 240 watts (120W x 2 panels). It does so by doubling the voltage of the array (24 V instead of 12V), while still producing the same current (10A). The middle diagram shows panels wired in parallel. makes the same amount of power (240 watts), but this time doubles the current produced by the array (20 A) while the voltage of the array remains the same (12V). In the diagram on the right, the four panels are wired in a series/parallel combination. Two sets of panels are wired in series, effectively producing two, 240 watt arrays that product 24V and 10A. The two series arrays are then wired in parallel, producing a 480 watt array that produces 24V and 20A.
Series/Parallel Wiring concerns
Shading just a small portion of a solar panel significantly decreases its performance. Sailboats are full of tall objects that produce shade (think: boom, mast, standing rigging, etc.). It’s best to site your panels as high as possible in places that will experience the least amount of shading possible. Shading a small amount of a single panel in a wired array can significantly bring down the entire array’s performance. Arrays that are wired in parallel are more resistant to shading effects that panels that are wired in series. Even small amounts of shade can reduce the output of a small array wired in series by nearly 40%. The same array, experiencing the same limited shade, wired in parallel will only experience reduced output of around 20%. Keep in mind: when wiring solar panels in parallel, you are increasing the array’s current potential and you need to consider fusing at each panel connection. See the Fusing section below.
AltE Store - wiring solar panels for shading
When wiring solar panels in series, as we discussed above, the voltage of the system increases. Consider the final voltage that your array will be running at. Should your panels ever short to other metallic objects on your boat, 50V is generally considered to be the voltage limit that’s safe to touch. When thinking about solar installations, I think it’s generally good practice to try to limit your installations to 50V or less, unless a grounding system is tied into the solar array. Keeping your solar array below 50V will ensure your array is maximally safe.

My first arrayed solar setup, combining panels of different sizes in a series/parallel combination.
First of all - I wouldn’t suggest implementing a setup like this, but I like to experiment. KISS - “keep it simple, sunshine” is the lesson learned. Here’s the story: This array supported me during my first year of full time living and working aboard. The two, smaller, outer panels are 180-watt off-brand panels I purchased on Amazon. I picked these panels specifically so that, when they are wired together in series, they match the voltage (almost exactly) of the center panel, a JA Solar 350 panel. The two, series-wired outside panels were then wired in parallel with the center panel. The array was then wired directly into a Victron Energy SmartSolar 150|50 controller.
When wiring different-size panels together and into a single charge controller, it’s important that panels, or combinations of panels, match in amperage when wired with others in series, or serious losses in efficiency will occur. When panels, or combinations of panels, are wired together in parallel, it’s important that they match in voltage, or again, serious losses of efficiency will occur.
Overall, I wouldn’t recommended choosing this kind of mixed-panel setup when wiring into a single controller. It didn’t perform anywhere near where I expected it to perform, only reaching about 66% of its max power output in perfect conditions. The 180 watt outer panels only added about 100 watts of additional power (vs. 360 watts of theoretical gain) vs. the JA Solar panel operating alone. I believe that the lower quality, off-brand Amazon panels ultimately dragged down the performance of the quality JA Solar panel. Wiring the outer panels into a separate controller would certainly have returned the array to it’s maximum performance. I think the output of the off-brand Amazon panels will always be dubious, but when wired into a separate controller and isolated from the quality, JA Solar panel, their questionable performance won’t drag down the performance of the quality panel.
Solar Controllers
Buy Victron Energy Controllers here: Victron Energy Smart Solar Controller - Amazon Affiliate Link

My Victron Smart Solar 100|50 (100V solar side, 50A charge current battery side). The Smart Solar line provides integrated bluetooth monitoring and firmware updates through a smartphone app.
Solar panel arrays that are bigger than a small, battery-tending trickle charging array require a charge controller installed between the solar panel array and the batteries. The charge controller converts the voltage coming from the solar panel array into a voltage that is appropriate for charging your batteries. It also controls the charging process of the batteries depending on their chemistry. Like traditional battery chargers, most quality charge controllers can be programmed to work with the specific battery chemistry you are using in your off-grid power system. Several different types of controllers are available, but MPPT style, modern and efficient charge controllers are affordable and usually offer the best output. My experience with solar panels is that you will almost always want more power when living off-grid. When designing your solar setup, aim to use components that will give you the highest efficiency, even if they cost more.
Sizing a Controller
I use Victron Energy Smart Solar solar controllers in my charter boat. I like it because it “just works”. After initially installing it, it generates power for me day after day, with no babysitting from me. The on-board Bluetooth reporting features, integrated right into the unit, of the Smart Solar are fantastic for tracking how much power my array is generating.
When picking a size controller, it is very important that you pay close attention to the maximum voltage your chosen solar panel array will generate. Think about what panels you have, and whether they will be wired in series or parallel. Exposing your controller to too much voltage will damage your controller. The calculator I have linked below is very helpful. Solar panel sellers normally give detailed specs. on their panels. If you have panels already on-hand, detailed specs are usually listed on a sticker on the back of the panel. You will need to plug the detailed specs of the solar panels you have (or are shopping for) into the calculator. If the specs of panels you are considering aren’t available, consider moving on from that seller. There are loads of quality solar panels available for very reasonable prices everywhere.
Resources
For deeper reading on MPPT Charge Controllers, see Victron’s blog post below
Victron Energy, Sizing MPPT Charge Controllers Blog Post - https://www.victronenergy.com/blog/2014/03/28/matching-victron-energy-solar-modules-to-the-new-mppt-charge-regulators/
Victron Energy publishes a handy calculator for sizing a charge controller, here: Victron Energy Solar Charge Controller Sizing Calculator. Note the little button that allows you to turn on “custom module” for picking a custom solar panel that you know the specs on. I missed this button the first time around when I started using this calculator.
The calculator even spits out a forecasted energy yield based on your location, very helpful for exerimenting with different sized solar arrays. Remember that you can convert the kW*h units that the calculator provides into amp hours by multiplying kWh shown on the calculator by 1000, then dividing by your system’s nominal battery voltage.
Example: 1.2 kWh forecasted per day x 1000 kWh/Wh / 12 Volts nominal battery voltage = 100 amp hours per day.
Wiring Solar Setups
First, it’s worth watching this video on the difference between cheap connectors, wires, and lugs versus quality components. I strongly recommend buying the high quality components I recommend here, vs. going with cheap, Chinese Amazon/Harbor Freight/Wal-Mart components. A fire on board is nothing to mess around with. See more information below.
Resources
Blue Sea Systems - Choosing Wire Size
This is a great resource for familiarizing yourself with the fundamentals of sizing wires for marine electrical installations. Once you’re familiar with the fundamentals, you can use the calculator I’ve linked below to quickly calculate wire sizes for your project.
Blue Sea Systems - Circuit Wizard (works for 12, 24, and 32V)
Wire Sizing Calculator (works with all voltages).
Sizing the right size wire for both the solar panel side and battery side of the controller is very important for both safety and good performance. Be sure to specify copper wire. Try to keep voltage drops around 2%. Find the max. temperature specs. for the wire you intend to use to plug into the calculator. I suggest only using quality, marine-grade wiring. I suggest plugging in temperature specs. into the calculator that are well below the maximum specified temperature of the wire you’re using. Generally, plugging a 1-3% voltage drop in the wires should ensure that your wire won’t get hot, but it’s always smart to be as careful as possible when sizing wires.
Tools
Special crimpers are needed to crimp the ferrules onto the wire for an MC4 connector. It is absolutely crucial that you use a specialized MC4 crimping tool to make the connections. Standard crimpers won’t give the right crimp and your connector integrity will be compromised. I’ve tried it, it doesn’t work.
I have had good success crimping MC4 connectors (including with these crimpers: https://amzn.to/3V4V1AY (Amazon Affiliate Link)
This seller offers crimping dies in a set that easily change out into this ratcheting crimper handle for a variety of other crimping tasks (including crimping waterproof connectors). Their six-piece kit offers a decent bang for your buck for general marine wiring tasks. NOTE: I have not had good luck with crimping smaller battery cable lug connections with this tool.
Basic Wiring Diagram
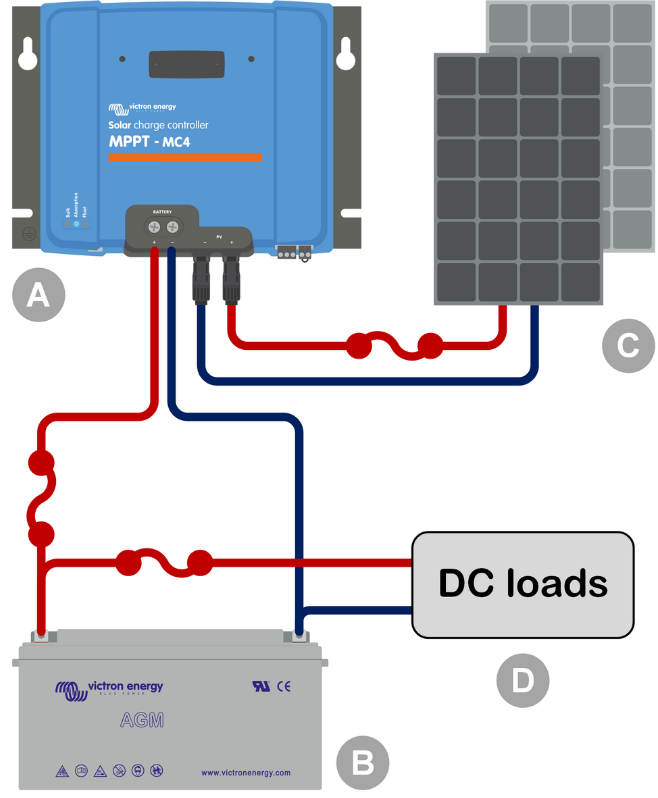
Basic Marine Solar Wiring Diagram
A is the solar controller. This could be any make or model of solar controller, but since I am focusing on Victron products, this is either your SmartSolar (with integrated bluetooth) or BlueSolar MPPT charge controller.
B is your batteries. B is for battery… that works. See our Sailboat Power Storage page for more information on marine batteries.
C is your solar panels. This could be a single panel or an entire solar panel array wired in series, parallel, or combinations of both.
D are the DC loads wired into the battery. Unless you are building an electrical system from scratch, these loads are normally already wired into your boat. In small electrical systems, the DC loads may be wired directly into the battery. Larger systems will generally have a bus bar or DC distribution panel wired into the batteries for distribution to the DC loads.
The Squiggly Lines are your all-important DC fuses. These could be simple in-line fuse holders. These are extremely important safety features of your solar system that prevent fires from melting wires caused by DC electrical shorts. As for any load connected directly to the positive battery terminal, the fuse for the connection of the MPPT charge controller should be located as close to the battery as possible. ABYC code calls for fuses to be placed no more than seven inches from the wire’s connection to the positive terminal. Fuses are extremely important. See the section below for a discussion of fusing.
Fusing
Fusing is extremely important when dealing with marine electrical. The essence of a fuse is to protect the wire from melting in an over-current/short situation, which can lead to fires. Since fiberglass is flammable, fires onboard a fiberglass boat can quickly spread, leading to a rapidly developing, very dangerous situation. Think of a fuse like a pressure release valve. If a wire is carrying too much current (pressure), the fuse will blow (safely), protecting the wire from melting and potentially starting a fire. Since fuses protect the wires in your circuit, fuses are sized according to the size of the wires they are in circuit with.
Generally, the solar panel side of a solar system does not need to be fused, unless panels are wired in parallel. See the resource cited below for more information on fusing panels. The battery-side must be fused according to ABYC specifications. See our Sailboat Electrical Systems page under the Fusing section for more information about fusing wires connected to batteries.
Solar Panel Fusing Resources
https://explorist.life/how-to-fuse-a-solar-panel-array-and-why-you-may-not-need-to/
This page is a great write-up about fusing on the solar panel side of the system, which is generally applicable when wiring panels in parallel.
Solar-side connections - mc4 connectors
MC4 Connectors are the industry standard for watertight, weatherproof connectors. They were invented by a German company called Stäubli and have been ubiquitously copied by reputable companies (such as Victron) and companies that are less reputable (like most of the MC4 connectors found on Amazon). MC4 connectors require a tool to take apart. They require a crimping tool during initial assembly to crimp the ferrules onto the wire you are using to wire you solar panels (see the TOOLS section above).
If you are building a new marine solar system from scratch, I would recommend buying genuine Stäubli connectors direct from Stäubli’s USA distributor. Their connectors are extremely high quality, they sell the connector disconnect tool with their 10-piece kit, and their technical/sales support team is very professional. Their connectors “just work”.
Buy genuine Stäubli MC4 connectors here: https://www.ecs-ecart.com/store/p231/MC4-10-Piece-Kit-10-12-AWG-5-6mm-OD.html#/
Connector Safety
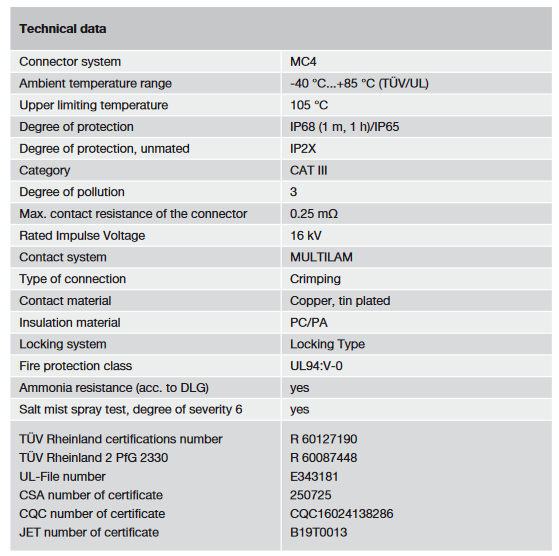
Stabuli MC4 Tech Data snipped from their literature. This kind of quality and testing is what you’re paying for when you go with premium connectors. Even when cheap, generic connectors list IP and/or UL certification, I would be skeptical that those, specific connectors are actually tested.
Think twice about buying generic MC4 connectors from Amazon. I have experimented with them and their quality is mixed at best. Our outdoor electrical connections take a lot of abuse in a marine environment and I think it’s prudent to buy the best connectors available. On our Sailboat Electrical Systems page I linked to a couple resources on UL and IP ratings. In Stäubli’s documentation they state that their connectors are rated IP68, meaning they are waterproof up to full immersion in water 1.5 meters deep for 30 minutes. They are rated as UL94:V-0 fire rating, meaning that the plastic used to construct the connector is very unlikely to start a fire should the connector melt. Companies spend a lot of money to attain IP and UL certifications. This is what you are paying for with a premium product: safety.
Other connectors available from Victron, Bay Marine Supply, or any trusted marine supply store are generally good quality. Always look for IP and UL ratings when buying connectors.
Mixing Connectors
Adding to the mess up solar connectors, users on Reddit have reported fires/excess heat buildup as a result of mixing “MC4” connectors from different brands. The main issue seems to be that Stäubli has not licensed the MC4 connector technology/manufacturing specs/dimensions to any other entities, so other manufacturers are making their best attempt to knock them off without referring to an official standard. Some connectors from different brands might not fit together properly. To avoid issues: use either all genuine Stäubli connectors in your installation (you may need to change out the connectors on a cheaper solar panel), or use all of the same knock-off connectors from a trusted supplier such as Victron, Bay Marine Supply.